
How To Add Space In Visual Studio Code?
How To Add Space In Visual Studio Code?
Have you ever felt the need to add extra space or line breaks in your code while using Visual Studio Code? Well, you’re in luck! In this article, we’ll explore various ways to add space and improve readability in Visual Studio Code. Whether you’re a beginner or an experienced coder, these tips and tricks will make your code more organized and easier to navigate.
So, let’s dive in and discover how you can add space in Visual Studio Code to enhance your coding experience!
How do I add tab space in VS Code?
To add tab space in VS Code, follow these steps:
1. Open Visual Studio Code.
2. Click on the “Settings” option at the bottom left corner.
3. In the settings menu, find and click on “Tab size”.
4. Type in the desired tab size you want to use.
By following these steps, you can easily customize the tab size in VS Code to your preferred value. This feature allows you to adjust the indentation of your code, making it more readable and consistent.
Remember that the tab size setting affects the visual appearance, but does not modify the actual content of your code. It is good practice to align your code with spaces rather than tabs to ensure consistency across different editors and platforms.
Overall, adjusting the tab size in VS Code is a simple process that enhances your coding experience and readability of your code.
How to Add Space in Visual Studio Code?
Welcome to the ultimate guide on how to add space in Visual Studio Code. Visual Studio Code is a popular and powerful code editor used by developers worldwide. While it offers a clean and efficient interface, some users may find the need for additional space to enhance their coding experience. In this article, we will explore various methods and techniques to add space in Visual Studio Code, allowing you to tailor the editor to your specific preferences and needs.
Using Themes to Add Space in Visual Studio Code
If you’re looking for a quick and easy way to add space in Visual Studio Code, using themes can be a great solution. Themes not only customize the appearance of the editor but also offer options to increase the spacing between various elements.
There are numerous themes available in the Visual Studio Code marketplace that provide options for adding space. One popular theme is the “Material Theme” which offers a variety of customization options, including the ability to adjust the spacing between lines, editors, and sidebars. To install the Material Theme, follow these steps:
- Open Visual Studio Code and click on the Extensions tab on the sidebar.
- Search for “Material Theme” in the marketplace.
- Click on the “Install” button next to the Material Theme extension.
- Once installed, reload Visual Studio Code to apply the theme.
- To customize the spacing, open the Command Palette by pressing “Ctrl + Shift + P” (or “Cmd + Shift + P” on macOS) and type “Preferences: Open Settings (JSON)”.
- In the settings.json file, add the following lines to adjust the spacing:
{
  "editor.lineHeight": 24,
  "editor.fontSize": 16,
  "editor.padding.top": 10,
  "editor.padding.bottom": 10,
  "editor.padding.right": 20,
  "editor.padding.left": 20
}
Feel free to experiment with different values for the line height, font size, and padding to achieve the desired amount of space. Once you’ve made the changes, save the settings.json file and enjoy the added space in Visual Studio Code with the Material Theme.
Extensions for Adding Space in Visual Studio Code
In addition to using themes, Visual Studio Code offers a wide array of extensions that can be used to add space and enhance the overall workspace. These extensions provide features such as customizable layouts, increased spacing, and improved organization of files and folders.
One popular extension that adds space to Visual Studio Code is “Bracket Pair Colorizer”. This extension helps make the code more readable by colorizing matching brackets. Along with this, it also adds a configurable padding around brackets, making them more visually distinct. To install the Bracket Pair Colorizer extension, follow these steps:
- Open Visual Studio Code and click on the Extensions tab on the sidebar.
- Search for “Bracket Pair Colorizer” in the marketplace.
- Click on the “Install” button next to the Bracket Pair Colorizer extension.
- Once installed, reload Visual Studio Code to activate the extension.
- Open any file containing brackets, and you’ll see that the matching brackets are colorized.
- To customize the padding around the brackets, open the Command Palette by pressing “Ctrl + Shift + P” (or “Cmd + Shift + P” on macOS) and type “Preferences: Open Settings (JSON)”.
- In the settings.json file, add the following lines to adjust the padding:
{
  "bracketPairColorizer.consecutivePairs": [
    "()",
    "[]",
    "{}"
  ],
  "bracketPairColorizer.padding": "2px 0"
}
By modifying the value of the “padding” property, you can increase or decrease the padding around the brackets. Save the settings.json file and experience the enhanced readability and added spacing in Visual Studio Code with the Bracket Pair Colorizer extension.
Splitting Editors for Increased Space
Another way to add space in Visual Studio Code is by utilizing the editor splitting feature. This feature allows you to divide the editor area into multiple sections, enabling you to view different code files side by side or have additional space for reference materials or documentation.
To split the editor in Visual Studio Code, follow these steps:
- Open the file you want to split in the editor.
- Right-click on the file’s tab and select “Split Editor”.
- The editor area will now be split, and you can either drag and drop another file onto the split area or open a new file in the split editor.
- To adjust the size of each split, hover over the boundary between the splits until the cursor changes to a resize icon. Then, click and drag the boundary to increase or decrease the size.
- Additionally, you can split the editor horizontally or vertically by right-clicking on the file’s tab and selecting either “Split Editor Left/Right” or “Split Editor Above/Below”.
Splitting the editor not only provides more space for coding but also offers an efficient way to navigate between files and compare code side by side. Experiment with different split configurations to find the setup that works best for you.
Using Snippets for Increased Productivity
Snippets are a powerful feature in Visual Studio Code that can significantly increase your productivity and help save time while coding. By utilizing snippets, you can create predefined blocks of code that can be easily inserted into your files, reducing the need to type repetitive code and providing more space.
Visual Studio Code comes with a built-in snippet functionality, and you can also find numerous snippet extensions in the marketplace. To create a custom snippet in Visual Studio Code, follow these steps:
- Open Visual Studio Code and click on the “File” menu in the top navigation bar.
- Select “Preferences” and then “User Snippets”.
- Choose the language for which you want to create the snippet or select “New Global Snippets File” to create a snippet that works across all languages.
- Visual Studio Code will open the selected snippets file in the editor. Add a new snippet by using the following syntax:
{
  "snippetName": {
    "prefix": "prefixValue",
    "body": [
      "code to be inserted"
    ],
    "description": "description of the snippet"
  }
}
Replace “snippetName” with the desired name for your snippet, “prefixValue” with a unique prefix to trigger the snippet, and “code to be inserted” with the actual code you want to include. You can have multiple lines of code within the “body” array.
Save the file, and your custom snippet is now ready to use. To insert a snippet while coding, simply type the snippet’s prefix and press “Enter” or “Tab” to expand the snippet. This will insert the predefined code into your file, saving you time and providing more space for focusing on other parts of your code.
By utilizing themes, extensions, editor splitting, and snippets, you can effectively add space in Visual Studio Code and enhance your coding experience. Whether you prefer a visually spacious look or need more room for organizing your code, these techniques will help you customize and optimize the editor to match your specific needs. Happy coding!
How to show space in VS Code
To show spaces in Visual Studio Code (VS Code), you can utilize the Render Whitespace feature. Simply go to the settings page and enter “Render Whitespace” in the search bar. When the dropdown menu appears, select “all” to display all whitespace characters. This will allow you to see spaces and other whitespace elements in your code.
In addition to displaying spaces, you can also customize other whitespace options in VS Code. For example, you have the option to disable whitespace highlighting altogether if you prefer. This gives you control over how whitespace is presented in your code editor.
Remember that in order to show space in VS Code, ensure that all text is written in the English language. This will ensure that the software processes the whitespace and displays it correctly. So, make sure to keep your code and text in English to get the desired results when showing space in VS Code.
Frequently Asked Questions
Welcome to our FAQ section where we provide answers to commonly asked questions. If you have any questions or concerns, please feel free to browse through our FAQs for assistance.
How do I add tab space in VS Code?
If you want to change the tab size in Visual Studio Code, the first step is to open the program. Once you have it open, locate and click on the “Settings” option at the bottom left corner of the interface. This will open the settings menu. In the settings menu, search for the “Tab size” option. You can simply type “Tab size” in the search bar to quickly locate it. Once you find it, click on it. In the tab size field, type in the desired tab size of your choice. This will ensure that your code is indented with the specified number of spaces when you use the tab key while coding in Visual Studio Code.
How do you show space in VS Code?
To show spaces in VS Code, you can follow these steps. Firstly, locate the search bar on the settings page. Next, type “Render Whitespace” in the search bar and select it from the dropdown menu that appears. Once you have selected “Render Whitespace,” choose the option “all” to display all whitespace characters. This will enable you to visualize spaces in your code. Additionally, you can utilize this feature to customize other whitespace options such as disabling highlighting entirely. By following these steps, you can conveniently show spaces in VS Code and effectively manage whitespace in your code for enhanced readability and organization.
What is Ctrl space in Visual Studio code?
Ctrl+Space is a keyboard shortcut in Visual Studio code that allows users to trigger IntelliSense. IntelliSense is a feature that provides suggestions, auto-completion, and code snippets to help developers write code more efficiently. By pressing Ctrl+Space, or typing a specific trigger character like a dot in JavaScript, users can access a suggestions widget that displays relevant suggestions based on the code context. A helpful tip is that the suggestions widget supports CamelCase filtering, allowing users to quickly filter suggestions by typing the uppercase letters present in a method name. This feature helps developers save time and improve their productivity while coding in Visual Studio code.
Does VS Code have tabs or spaces?
In VS Code, users have the ability to customize their text indentation by choosing between tabs or spaces. By default, VS Code opts for spaces and employs 4 spaces per Tab key. However, if users prefer a different default, they can easily modify the editor.insertSpaces and editor.tabSize settings to suit their preferences. This flexibility allows users to tailor their coding experience to their individual needs and coding style within the VS Code editor.
Summary
Visual Studio Code is a great tool for coding, but sometimes we need more space to work efficiently. Here are some handy tips to add space in Visual Studio Code.
First, you can collapse code blocks by clicking on the minus sign next to the line numbers. This will hide the code and create more space for you to focus on the parts you need. Another option is to hide the sidebar by going to “View” and selecting “Hide Sidebar”. This will give you extra room for your code. Additionally, you can use the Zen mode by pressing “Ctrl+K Z” to maximize your workspace and remove distractions. Lastly, you can customize the layout by dragging panels to resize them according to your preference. With these simple tricks, you’ll have more space to code comfortably in Visual Studio Code!
How To Run A Js File In Visual Studio Code?
How To Run Angular Project In Visual Studio Code?
Related Posts
What is Microsoft Visual Studio used for?

Is Microsoft Visual Studio for free?
Is Visual Studio C# only?
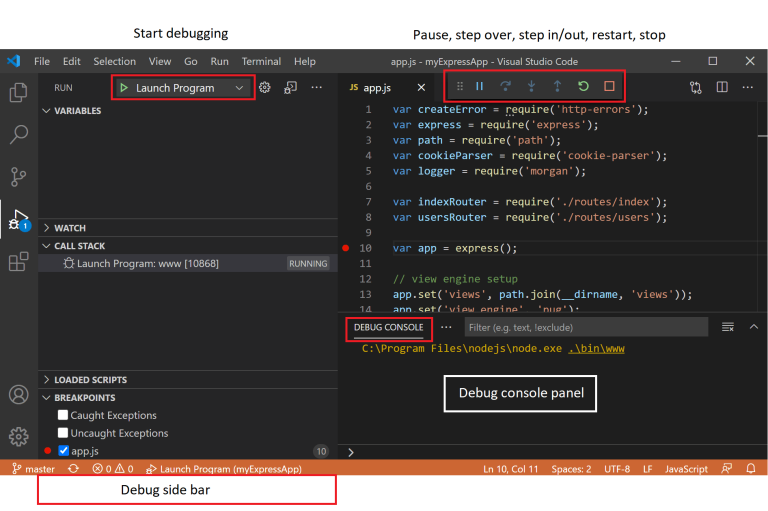
How To Debug Angular In Visual Studio Code?
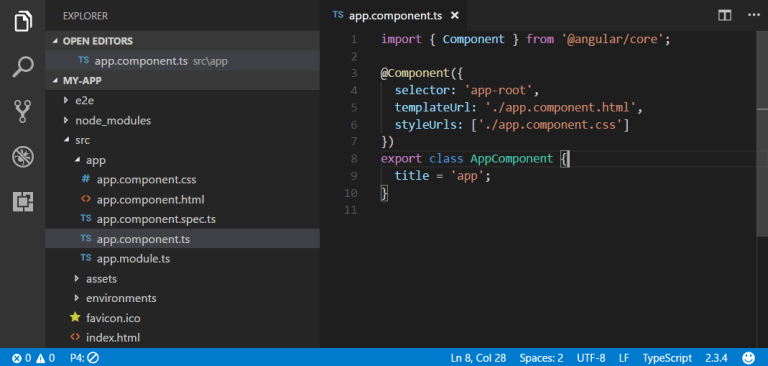
How To Run Angular Project In Visual Studio Code?
